Lab day 3 - Protein Quantification via BCA Assay
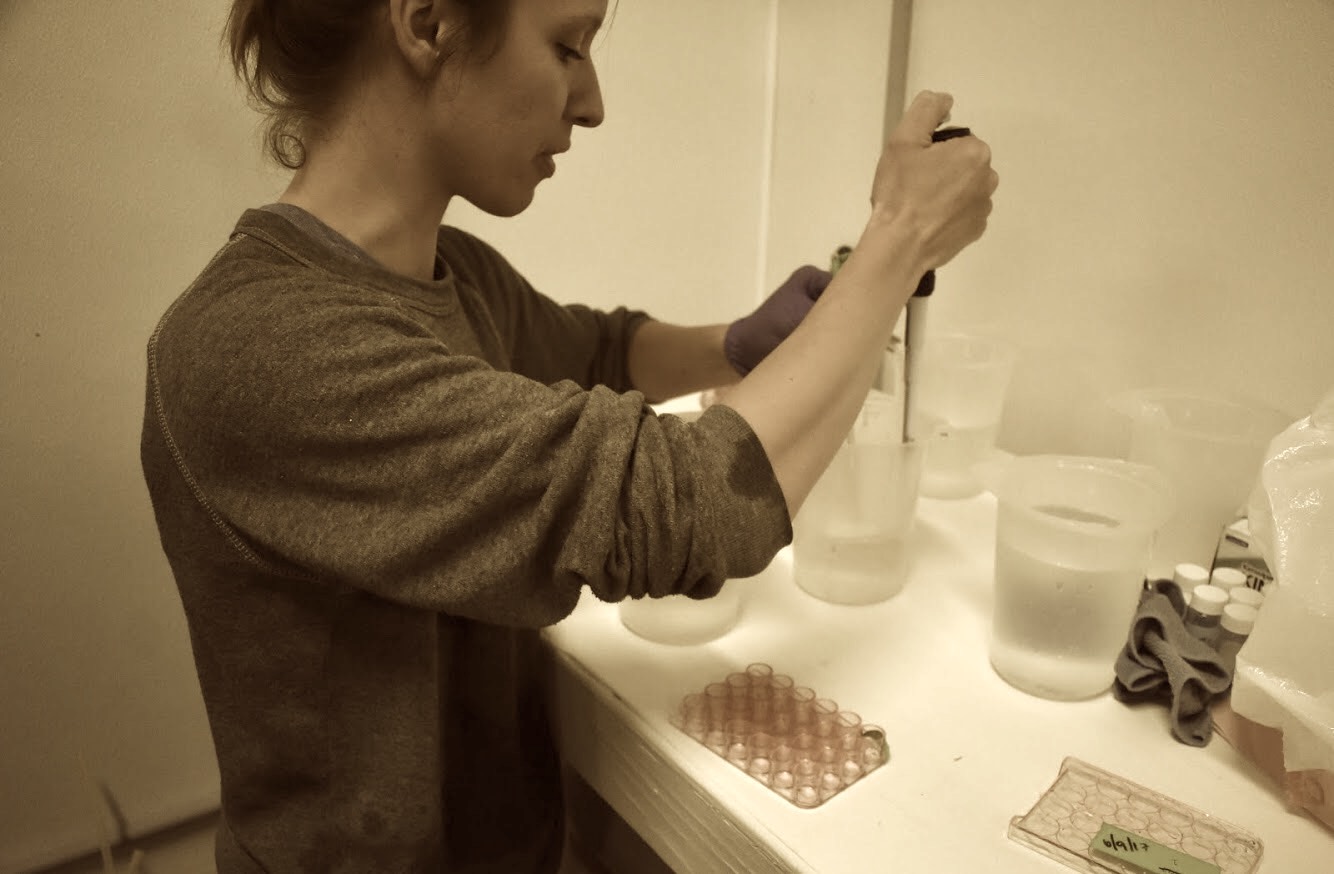
Today I determined the concentration of proteins in my samples. This was done via the Thermo Scientific - 23225 - BCA PROTEIN ASSAY KIT, following the protein prep protocol and Rhonda Elliott’s recent lab notebook entry.
Thanks to Rhonda Elliott for doing much of the heavy lifting to determine volumes needed for reagents!
Step 1: make reagents:
NOTE: Yaamini & I worked together, so the volumes of solutions outlined below are for 22 samples (11 per person)
- BCA Working reagent
- Volume needed: (8 standards + 22 samples)(3 replicates each)200ul of working reagent per well = 18,000ul = 18ml
- Required ratio is 50:1 BCA reagent A:BCA reagent B respectively
- To make: Use large pipette to add 20ml of Reagent A to a falcon tube, then add 400ul of Reagent B. Vortex. Total volume made: 20.4ml
- 50mM NH4HCO3 (Ammonium Bicarbonate)
- Volume needed: (22ul per sample)*(22 samples)
- MW of NH4HCO3 is 79.06 g/mol, therefore:
- (79.06g/mol)x(1mol/1,000mmol)x(50mM/1L)x(1L/1,000ml)x 10ml = need 0.03953g of NH4HCO3 in 10 ml.
- To make: add 5ml nanopure to falcon tube; add 0.03953g of NH4HCO3 and vortex to dissolve. Add solution to graduated cylinder and top off with nanopure to 10ml. Pour back into falcon tube, vortex.
- Lysis Buffer
- Volume neded: 2.2 mL
- MW: of Urea is 60.06g/ml, therefore:
- (60.06g/mol)x(6mol/L)x(1L/1000ml)x 4ml = 1.44g Urea to add to 4 ml of 50mM NH4HCO3
- Add 4ml of the recently made 50mM NH4HCO3 to falcon tube. Add 1.44g Urea to make the 6M solution, Vortex to dissolve. Add to graduated cylinder, top off with nanopure to 6ml total. Pour back in falcon tube, vortex.
Step 2: Make BCA Standards
- Label 8 1.5mL centrifuge tubes letters A-I
- Open a stock BSA (aka albumin standard) glass ampule by holding it with a kimwipe and breaking the top off.
- Beginning with Vials B & C mix the standards at the ratios outlined below.
- Vortex each standard after making.
- Vial B (1.5ug/ml BSA): Add 125ul of Lysis Buffer to 375ul stock BSA
- Vial C (1.0ug/ml BSA): Add 325ul of Lysis Buffer to 325ul stock BSA
- Vial D (0.75ug/ml BSA): Add 175ul of Lysis Buffer to 175ul Vial B dilution
- Vial E (0.5ug/ml BSA): Add 325ul of Lysis Buffer to 325ul Vial C dilution
- Vial F (0.25ug/ml BSA): Add 325ul of Lysis Buffer to 325 Vial E dilution
- Vial G (0.125ug/ml BSA): Add 325ul of Lysis Buffer to 325ul Vial F dilution
- Vial H (0.025ug/ml BSA): Add 400ul of Lysis Buffer to 100ul Vial G dilution
- Vial I (0.000ug/ml BSA): Add 500ul of lysis buffer
Step 3: Prepare samples
- Get samples that had been aliquoted for this quantification out of the -80C and put on wet ice to thaw, but now warm.
- Add 22ul of 50mM NH4HCO3 to each sample; total volume is now 33ul. Vortex then centrifuge.
- Keep on wet ice throutout the process, until you’ve pipetted into microplate.
Step 4: Pipette standards and samples into microplate
- Pipette 10ul of each standard into the corresponding microplate wells (see table); three replicates per standard.
- Pipette 10ul of each sample into the corresponding microplate well; three replicates per standard.
- Using a multipipette, add exactly 200ul of working reagent to each well.
Microplate arrangement:
- Standards are labeled B through I, in replicates
- Samples begin @ C1; G=Geoduck O=Oyster
| 1 | 2 | 3 | 4 | 5 | 6 | 7 | 8 | 9 | 10 | 11 | 12 | |
|---|---|---|---|---|---|---|---|---|---|---|---|---|
| A | B1 | B2 | B3 | C1 | C2 | C3 | D1 | D2 | D3 | E1 | E2 | E3 |
| B | F1 | F2 | F3 | G1 | G2 | G3 | H1 | H2 | H3 | I1 | I2 | I3 |
| C | G10 | G10 | G10 | G18 | G18 | G18 | G48 | G48 | G48 | G58 | G58 | G58 |
| D | G68 | G68 | G68 | G77 | G77 | G77 | G92 | G92 | G92 | G97 | G97 | G97 |
| E | G119 | G119 | G119 | G131 | G131 | G131 | O07 | O07 | O07 | O15 | O15 | O15 |
| F | O37 | O37 | O37 | O47 | O47 | O47 | O55 | O55 | O55 | O77 | O77 | O77 |
| G | O107 | O107 | O107 | O119 | O119 | O119 | O1271 | O127 | O127 | O142 | O142 | O142 |
| H | GBlank | GBlank | GBlank | OBlank | OBlank | OBlank | empty | empty | empty | empty | empty | empty |
Step 5: Read absorbance via plate reader
- Cover plate (we used parafilm); and take to Genome Science Building for next step.
- Incubate @ 37degC for 30 minutes
- If not already, seal top of microplate with appropriate adhesive seal (so well contents don’t splash out)
- Vortex lightly to mix
- Centrifuge lightly (we got the centrifuge up to ~1700rpm for a moment).
- Wipe bottom of microplate with kimwipe to remove any fingerprints or smudges. Make sure there are not scratches.
- Insert into spectrophotometer (plate reader), and read absorbance at 540nm; do multiple readings to ensure accuracy.
- Download data.
Step 6: Calculate standard concentration curve
- Take averages of all standard replicates
- Subtract the average aborbance for the blank standard from other standard averages.
- Prepare standard curve by plotting average blank-corrected standards’ absorbances vs. the standards’ concentrations in ug/ml.
- Add trendline; I used the polynomial regression type in Excel.
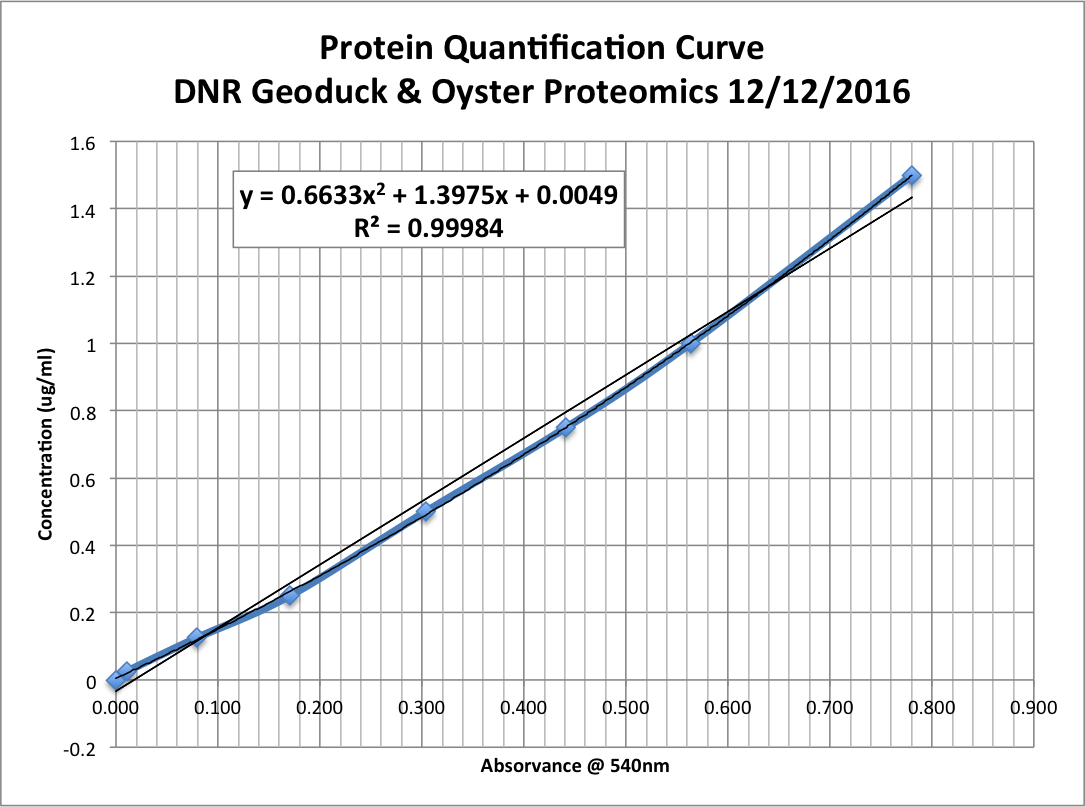
Step 7: Calculate protein concentration of each unknown sample.
- Use trendline’s equation to calculate concentrations (in ug/ul) of samples:
- y = 0.6633x2 + 1.3975x + 0.0049, x=aborbance (nm); y=concentration (ug/ul)
- Make sure to multiply the sample concentrations by 3, since they were diluted at Step #3 of this protocol.
Results!:
| Samples | Average absorbance @ 540nm | Blank-corr. (X- 0.072) | Calculated concentration (ug/ul) | Vol sample needed for 30ug (in ul) (existing vol of sample) |
|---|---|---|---|---|
| G10 | 0.207 | 0.135 | 0.619 | 48.502 |
| G18 | 0.225 | 0.153 | 0.704 | 42.593 |
| G48 | 0.445 | 0.373 | 1.857 | 16.153 |
| G58 | 0.2073 | 0.136 | 0.620 | 48.379 |
| G68 | 0.5727 | 0.501 | 2.615 | 11.474 |
| G77 | 0.3727 | 0.301 | 1.457 | 20.591 |
| G92 | 0.4077 | 0.336 | 1.648 | 18.204 |
| G97 | 0.1467 | 0.075 | 0.340 | 88.150 |
| G119 | 0.5480 | 0.476 | 2.463 | 12.179 |
| G131 | 0.0897 | 0.018 | 0.091 | 330.361 |
| GBlank | 0.109 | 0.038 | 0.175 | 170.998 |
Written on December 12, 2016